Posts tagged with beaglebone black - page 2

GPIO Blink an LED using C - BeagleBoneBlack

First enable gpio23 and set it as output.

echo 23 > /sys/class/gpio/export
echo out > /sys/class/gpio/gpio23/direction

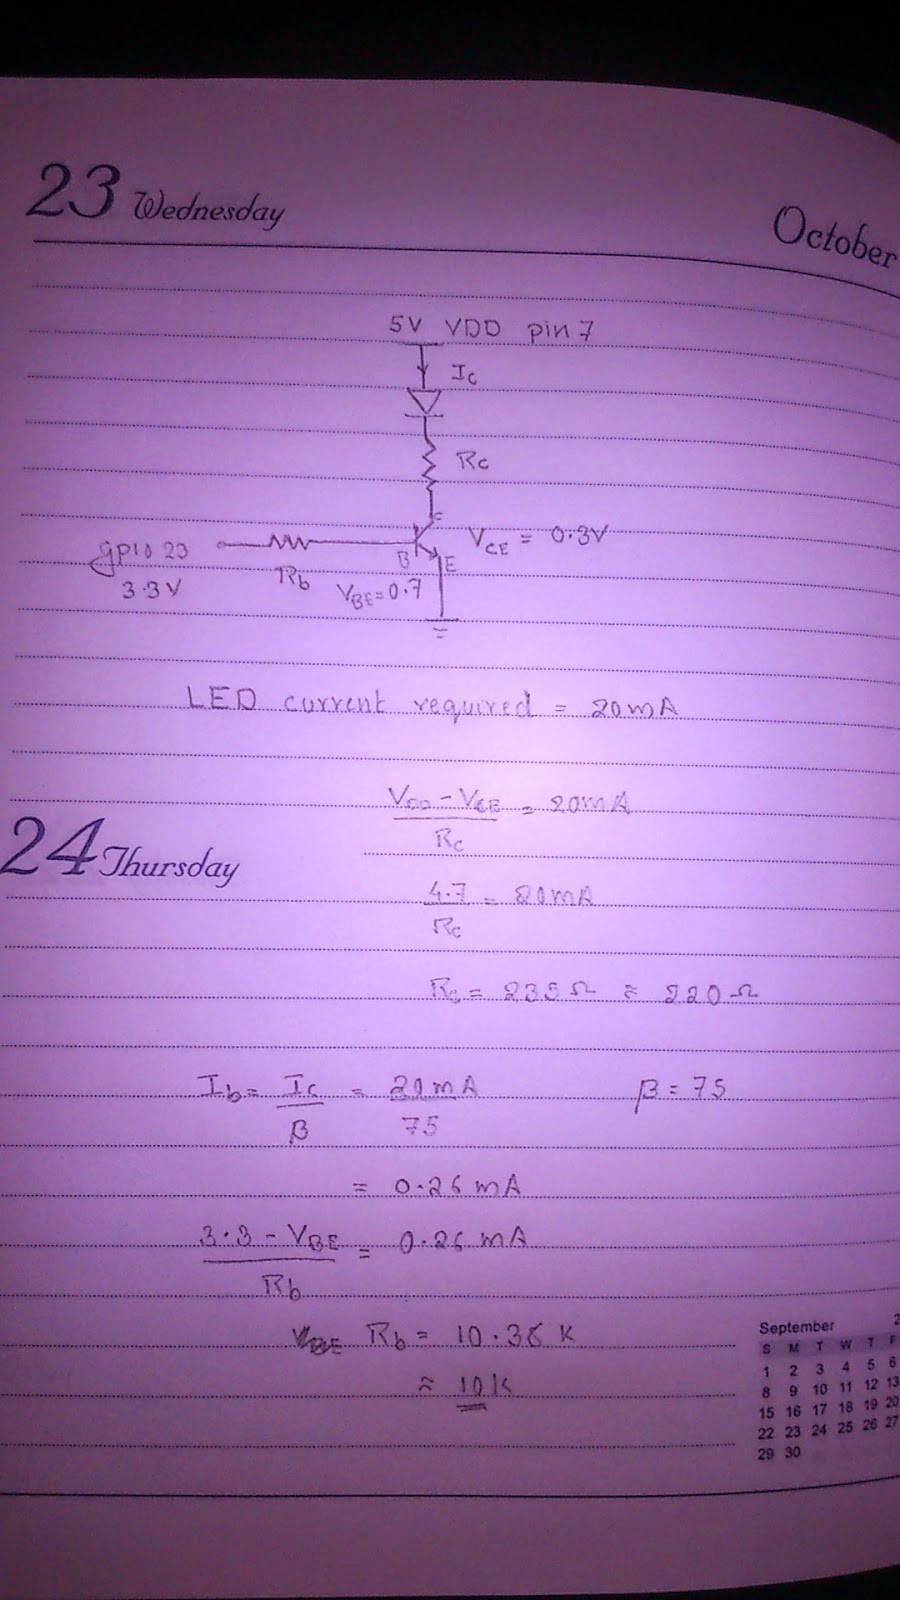
(Refer this page for circuit info.) Then compile this code and run it. There are two arguments to this code. One is the number of times the LED blinks and the other one is the delay in us.


GPIO Blinking an LED using bash script

Refer this site. This gives a fare idea about how to design a simple transistor switch. Or go to this site.

The max o/p voltage from the gpio pin is 3.3 V. But you can get a 5V VDD from Beaglebone Black board.

The circuit I designed is given below. The transistor I used is KN2222A. (You can use any transistor)


Will add a nice circuit diagram later. Once you are finished with the circuit follow the steps in this page.

cd /sys/class/gpio
echo 23 > export
cd gpio23
echo out > direction

Then save the script given below to a file and run this in your BBB. (It will blink the LED once every second.) Cntrl + C to stop the script.


Getting started with GPIO (Testing GPIO with a multimeter)

There are 65 possible GPIO pins that you can control. Some of the GPIO pins are normally configured to different functions. Let's play with one of them.

Go to the beaglebone website and figure out the header pin corresponding to gpio23.


The gpio23 is mapped to the 13th header pin. In this tutorial we are testing the gpio23 output using a multimeter (Do not connect an LED directly to BBB IO pin).

First go to following directory

cd /sys/class/gpio/

Then make gpio23 available

echo 23 > export

A new directory will be created. Open gpio directory.

cd gpio23

The direction of IO will be normally set as in (input).  To make it as output,

echo out > direction

Then set the pin to high using

echo 1 > value

Measure the voltage at pin 13 of P8 header. If its 3.3 V then you are on the right track. Pin 1 and 2 will be ground. You can connect the negative terminal of multimeter to pin 1 or 2.

To set output as zero,

echo 0 > value

After finished with the tutorial unexport the gpio23 pin.

cd ..
echo 23 > unexport

To get a better idea refer this site.

BeagleBoneBlack apt-get upgrade error due to led-aging.sh

When I try to upgrade my new BBB bought from element14 (4gb emmc) it throws a list of errors.

stem facility `$all' which can not be true!
insserv: Starting led_aging.sh depends on rmnologin and therefore on system facility `$all' which can not be true!
insserv:  loop involving service mountkernfs at depth 1
insserv: Starting led_aging.sh depends on rmnologin and therefore on system facility `$all' which can not be true!
insserv: exiting now without changing boot order!
update-rc.d: error: insserv rejected the script header
dpkg: error processing ppp (--configure):
 subprocess installed post-installation script returned error exit status 1
Errors were encountered while processing:
 rsyslog
 apache2.2-common
 apache2-mpm-worker
 apache2
 dbus
 dbus-x11
 hostapd
 openssh-server
 ppp
E: Sub-process /usr/bin/dpkg returned an error code (1)


The error was due to a file led-aging.sh. I found the solution from here. (By Dirk Koopman)

Edit the file

nano /etc/init.d/led_aging.sh

and replace the contents with

#!/bin/sh -e
### BEGIN INIT INFO
# Provides:          led_aging.sh
# Required-Start:    $local_fs
# Required-Stop:     $local_fs
# Default-Start:     2 3 4 5
# Default-Stop:      0 1 6
# Short-Description: Start LED aging
# Description:       Starts LED aging (whatever that is)
### END INIT INFO

x=$(/bin/ps -ef | /bin/grep "[l]ed_acc")
if [ ! -n "$x" -a -x /usr/bin/led_acc ]; then
    /usr/bin/led_acc &
fi

 
Then run

apt-get upgrade

again. It will solve the issue.

Getting internet on BBB via usb (Share internet from your linux machine)


Login to your BBB and type

route add default gw 192.168.7.1

Then type the follwing in your linux machine to route the network.

sudo su
iptables --table nat --append POSTROUTING --out-interface eth0 -j MASQUERADE
iptables --append FORWARD --in-interface eth1 -j ACCEPT 
echo 1 > /proc/sys/net/ipv4/ip_forward


Note: eth0 is LAN interface which has internet connectivity. eth1 is the usb network connection with BBB. 192.168.7.1 is the ip address that assigned to your PC.

Following part is not needed if internet is working properly.

If you are using network that doesn't allow third party dns server (like google dns 8.8.8.8 or 8.8.4.4), you had to configure /etc/resolv.conf.

First find out what dns server address your internet provider (your college) gives you. If you have a working network type

nm-tool

to find out the dnsaddress. Then delete all the entries in /etc/resolve.conf and replace it with

nameserver <dnsaddr>

eg: nameserver 192.168.0.5